

Hey, a new 3D video game model extraction tutorial!
That must mean a new papercraft from a video game series I didn't do before?
...Yes! > Halo! 😉
◾ Unpacking and extracting the game files (any ZIP program)

So as usual, first things first: to extract actual game models, you need to own the actual game of course. As you can see, I'm using the PC port of Halo: Combat Evolved.
- Insert the CD-ROM in your CD-ROM drive and open the FilesCab folder to find six .CAB archives
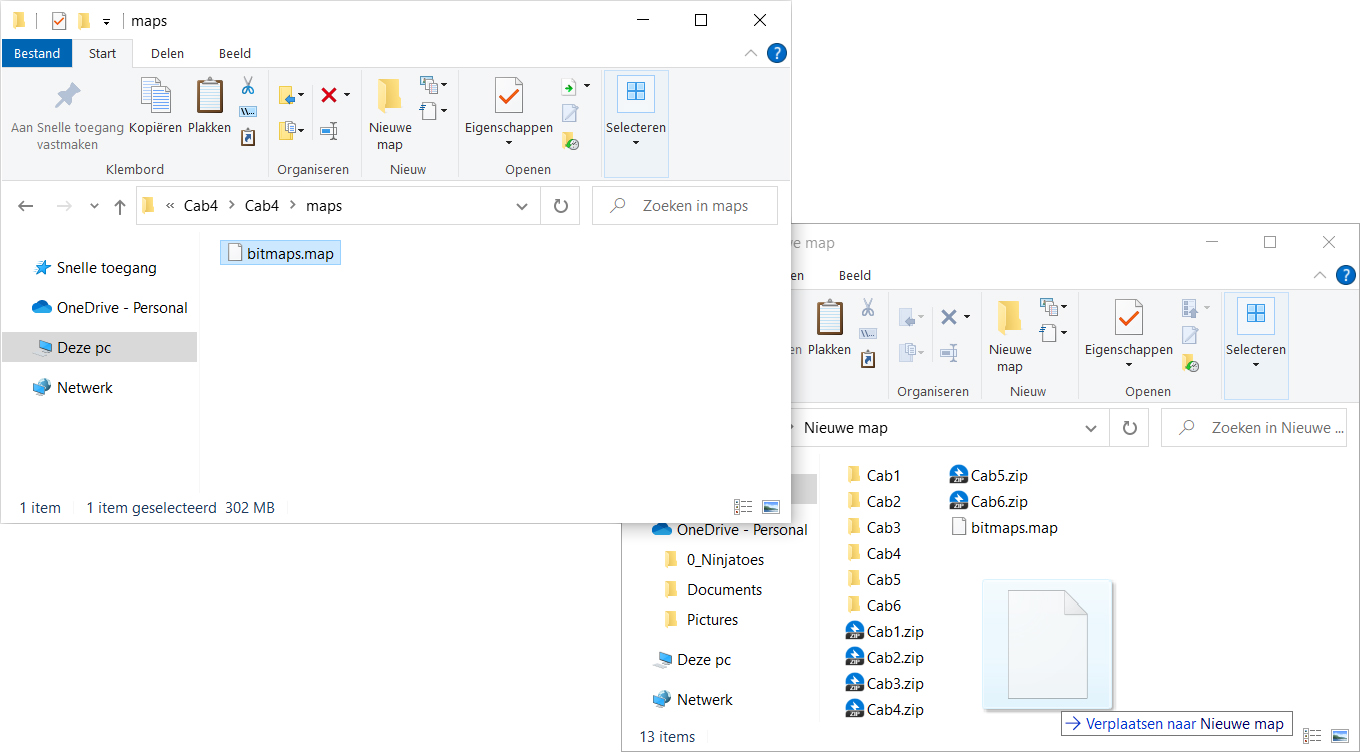
- The .CAB archives will have all the 3D models (and lots more things) so copy all six of them to a nice empty New folder to keep everything together.
- .CAB archives are really just .ZIP archives with a different file extension. Most ZIP programs will unpack them without problems as .CAB files, but if you want, you can change the .CAB file extension to > .ZIP first.
NOTE: You will probably already have a ZIP program, but if not, you can find many free ones online, like 7-ZIP.


- If you look in the unpacked Cab folders, you will a lot of .map files. Most of these .map files contain data for specific levels of the game, but there are three shared .map files that you should copy and always have in your working folder:
- From Cab4: the bitmaps.map (it holds the texture images we'll need)
- From Cab5: the sounds.map (the tools we'll be using might complain without it)
- From Cab6: ui.map (the tools we'll be using might complain without it)


- Besides these three shared .map files, you will need to copy one more .map file: any level .map that has the 3D model you want to extract! I happen to know that Master Chief is in the a10.map file fom the Cab1 archive, so that's the one I'll use.

◾ Getting a preview (Reclaimer by Gravemind)
- Although this step isn't absolutely necessary, it is very useful: with the Reclaimer tool made by Gravemind, you can get a quick and easy preview of what the 3D model you're planning to extract looks like, to see if it's the right one.
- First find the MediaFire link for the Current version at the bottom of Gravemind's post in the Halo Maps Forum:
- There are a few more tools in Gravemind's MediaFire folder, but the only one you need if you're following along with this extraction tutorial is the latest version of the Reclaimer.Setup file.
- Once downloaded, install the Reclaimer tool; you might get a warning from Microsoft Defender Smartscreen saying it prevented the unrecognized app from starting. If you trust the program you are trying to start, you can however click the More info button and then choose the Run Anyway option.
NOTE: Only bypass your computer's protection software if YOU completely trust the software of course and NEVER disable it completely!


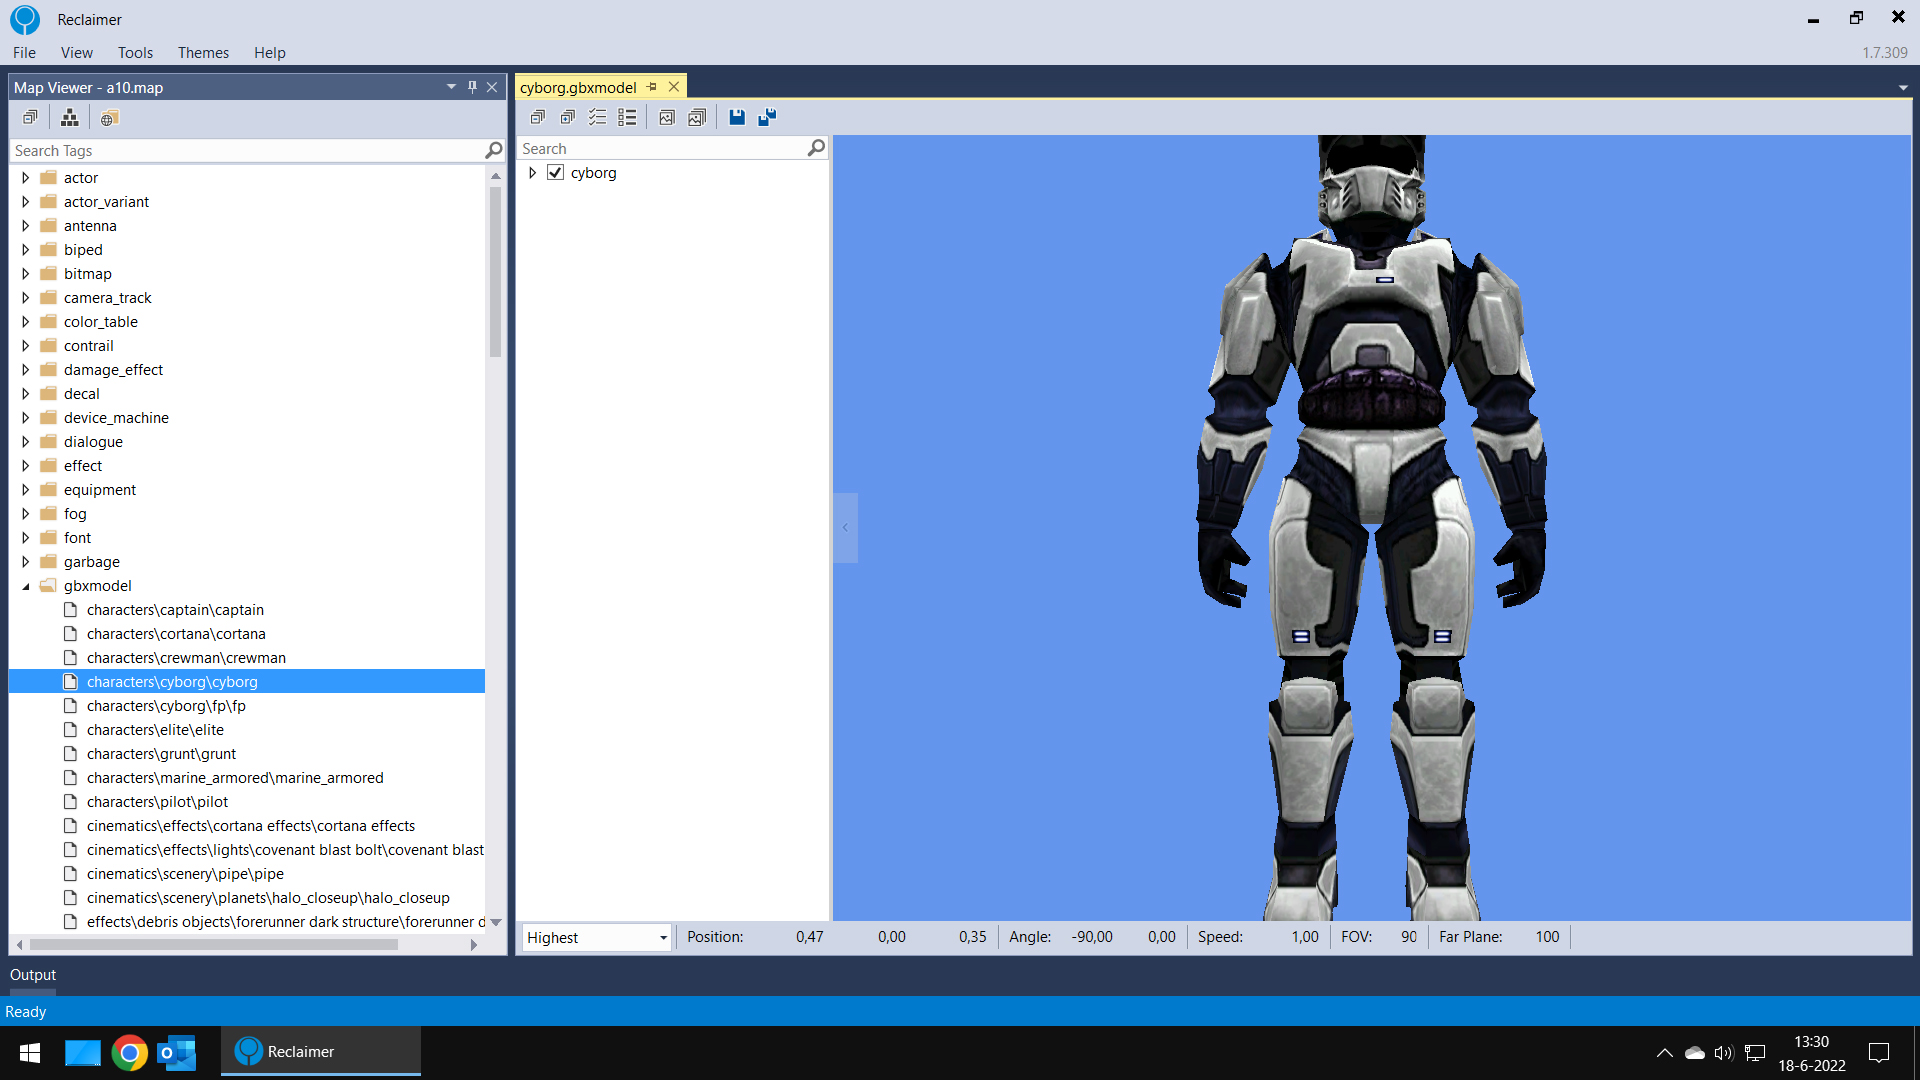
- Now start the Reclaimer program and choose File > Open Map and open the level .map file you want to use.
The Map Viewer file tree will be displayed, look for the gbxmodel folder in the file tree, where the Halo: Combat Evolved models are stored.
- Expand the gbxmodel folder and double-click the 3D model you want to see (Master Chief is a character called cyborg in the list).
- You can now see a quick preview of the model, but without any animations.
NOTE: If the preview is showing yellow instead of textured, you are missing the bitmaps.map file: it needs to be in the same folder as the level .map file you're using (hey, I told you already to make sure of this, didn't I! 😠)


NOTE: Here are some basic controls to look around in the viewer window:
- Right-click and drag the mouse to rotate around the model
- Hold right-click and use the WASD and F and R keys to move the model left and right, forwards and backwards and up and down
- Hold right-click and use th keys to move it up and down
- Hold the Shift key to move faster
- Even with the bitmaps.map file in the right folder though, the preview of Master Chief's model looks white instead of the recognizable green; don't worry, that's just the way it is, so that the game can give the players different colors in multiplayer matches.

- Other gbxmodels will look fine, but for Master Chief you'll have to add the green color yourself to the teture image later.
- Many Halo: Combat Evolved models have several different Levels Of Detail versions, from Highest to Lowest. You can see the differences if you select the different LOD versions using the dropdown box in the bottom left of the viewer window.


- Once you have made sure the model is what you want, remember the name.
NOTE: You could use Reclaimer to Extract the model and bitmaps (textures) right now, but the models would be in a standard, stiff pose. If you want to extract the models with their animations so you can choose a different, more interesting pose, keep reading.
◾ Extracting the 3D game model (Refinery, part of Mo's Editing Kit Essentials by MosesofEgypt)
- I used a tool called Refinery to extract the actual 3D model and animation and texture files all in one go.
- Refinery is part of Mo's Editing Kit by MosesofEgypt. The great thing is that he also made a 'lite' version that does everything we need for our purposes and that has Python 'baked in'so that won't cause any problems either: Mo's Editing Kit Essentials.
- Download the MEK_Essentials_Setup.latest_version.exe from MosesofEgypt's GitHub:
- When you try to install the Editing Kit, you might get a warning again from Microsoft Defender Smartscreen saying it prevented the unrecognized app from starting. If you trust the program you are trying to start, you can however click the More info button and then choose the Run Anyway option.
NOTE, AGAIN: only bypass your computer's protection software if YOU completely trust the software of course and NEVER disable it completely!


- Mo's Editing Kit has three tools (Mozzarilla, Pool and Refinery) that are used for different purposes when creating Halo mods, but to extract a 3D game model just as a base model for a papercraft, we just need to use the Refinery tool.
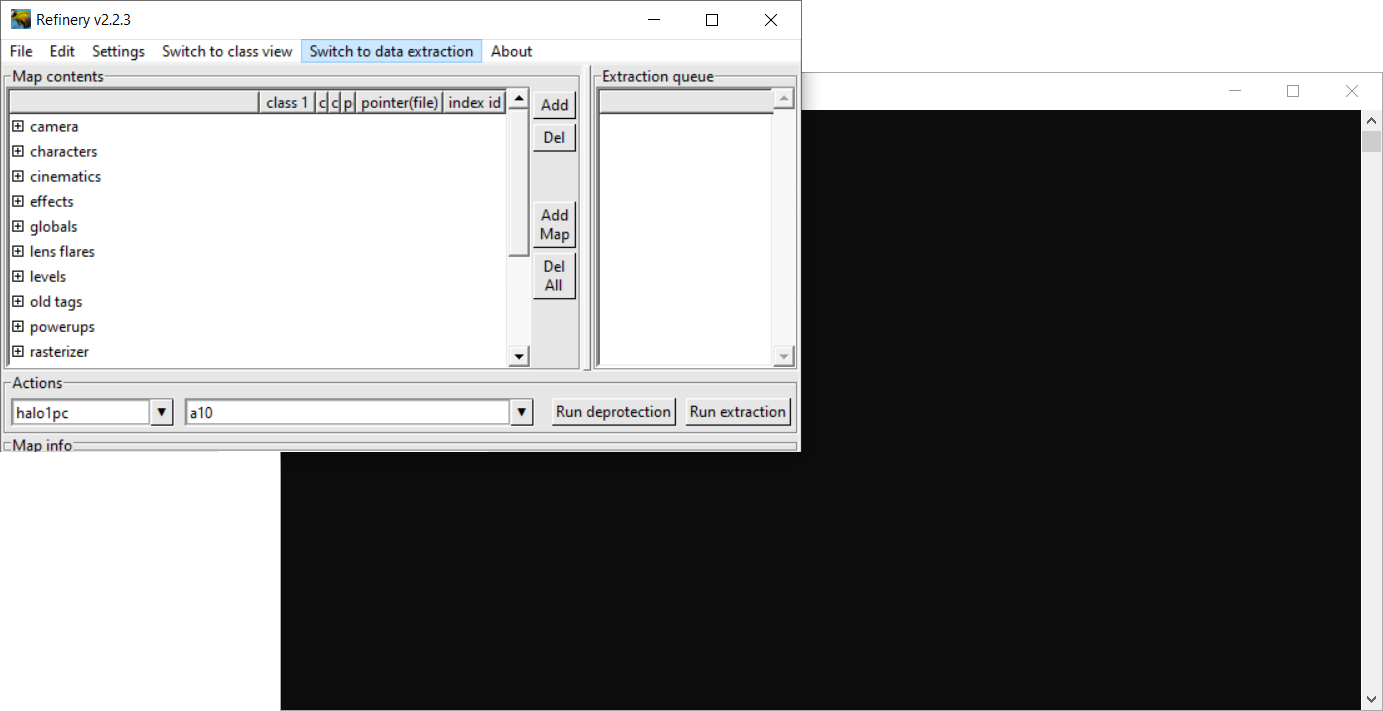
- Start Refinery and choose File > Load maps and open the level .map that has the 3D model you want to extract.
- Then first, Switch to data extraction mode by clicking that button in the menu bar at the top (you'll see a slight change in the file tree in the window).
- Now find the 3D model you want to extract, in this case the characters > cyborg.
- Expand the cyborg folder in the file tree it and you'll see that it has its bitmaps (textures), gbxmodel (the actual 3D model) and its animations attached to it.
- Make sure only the top level of the cyborg character in the file tree is selected so the extraction process will include everything in its substructure.
- Then click the Add button at the top right next to the file tree window to Add the cyborg character to the Extraction queue.
- Doing so will activate an options box.
- Use the Browse button to change the Directory to extract to to the New folder you created as your working folder.
- Once you've set the folder you want to extract the resulting files to in the options box, click the Add to queue button.
- The cyborg character is now added to the Extraction queue; if everything is set up properly, you can click the Run extraction button to actually start the extraction.
- In the background, the black code window will tell you which files were extracted and how long it took, and in your New folder you will now see a new folder called characters > cyborg with the extracted files.


◾ Converting the 3D game model (Blender 3.1.0 or newer with Halo Asset Blender Development Toolset add-on)
- You will see that the models itself (in the different Levels of Detail) are saved in a .jms format and the animations are saved as .jma (or similar) files.


- You'll need a special add-on for Blender 3.1.0 or newer to open these types of files: the Halo Asset Blender Development Toolset by General-101.
- Download the latest release as either a full of lite version (the lite version worked fine for me) from General-101's GitHub page:
- Now download version 3.1.0 or newer of the Blender 3D program:
- Start up Blender and first of all, delete the standard cube in the middle of the screen: it's anooying and you don't want it. 😉
- Once you have a clean file, choose Edit > Preferences and select the Add-ons option in the list.
- Click the Install an Add-on button at the top and browse to the Halo Asset Blender Development Toolset ZIP file you just downloaded; select it and click the Install Add-on button.
- You'll be taken back to the Blender Preferences Add-Ons window; find the Import-Export: Halo Asset Blender Development Toolset add-on that has been added to the add-ons list and put a checkmark in the checkbox to activate it.
- Save the changes you made by clicking the 'hamburger' menu icon of three horizontal lines in the bottom left of the Blender Preferences window and clicking Save Preferences.


- Close the Blender Preferences window and in the menu bar of the main window, choose File > Import > Halo Jointed Model Skeleton (.jms) and open one of the .jms files you exported with the Refinery program.
- The model will be quite large, so zoom out a bit.
- Now in the same Blender scene, choose File > Import > Halo Jointed Model Animation (.jma) and import one of the animations you extracted along with the skeletal model (you can try a .jmo, .jmo, .jmr or .jmt animation as well, but you might get a... funny result with one of those 😉).
- You can immediately see that Master Chief will have a much nicer action pose now, and if you want, you can try moving the blue "1" frame marker along the animation slider bar at the bottom to select an even nicer pose.
- Once you're happy, choose File > Export > Wavefront (.obj). to export the model as a 3D Wavefront .obj file which can be opened in most 3D programs.


◾ Opening the Exported Files (Metasequoia or another 3D program)
- If you open the exported Wavefront .obj file in Metasequoia (which I like to use as 3D modelling program because it is a perfect combination with Pepakura Designer that I use to unfold the final 3D model into 2D papercraft parts later on) DON'T check the Flip left and Right box in the OBJ Import option box (or else the 3D model will be mirrored)
- DO check the Invert V of mapping option though, so that the textures will be flipped and they will look correct on the 3D model.
- You will see that there are several spheres and small cubes in the model that are used by the game as reference points. You can delete them of course if you're just using the model as a base point for making a papercraft.


- Now look in the characters > cyborg > bitmaps folder to find the .dds texture images; assign them to the appropriate Materials in Metasequoia to give Master Chief some color.
- Like we saw in the Reclaimer preview though, Master Chief's armor texture is white instead of green, so you'll have to give it its green color yourself in an image editing program.
- Then assign the re-colored texture image to Master Chief's armor.


- You can see Metasequoia has no problem with .dds files, but to open the textures in Pepakura Designer later on you will need to change them to a different image type, like .bmp, .png or .jpg for example.
- If you have an image editing program that can open .dds files, just do so and then save them as .bmp files for example. Alternatively, you can try a special image conversion tool like the free, zipped version of XnConvert, or a free online tool like ImageToStl.
dds converted to bmp
- Now all you need to do is repeat these steps for the weapon(s) you want Master Chief to have! 🙂
NOTE: I found most weapons won't show a good preview in Reclaimer, but the ones I tried Exported and Import without problems for me in Refinery and Blender.


- And that's that: you have a nice starting point to make into a new papercraft again:

Have fun and stay tuned while I make Master Chief into one too! 😀
Stay tuned!
Tools used:
- Reclaimer 1.7.309 by Gravemind (to get a preview of the model): http://forum.halomaps.org/index.cfm?page=topic&topicID=51331
- Refinery v2.2.3, part of Mo's Editing Kit Essentials, MEKE v1.0.6.0 (to actually Extract the model files) by MosesofEgypt: https://github.com/Sigmmma/mek_essentials/releases/latest
- Blender 3.1.0 or newer: https://www.blender.org/download/
- Halo Asset Blender Development Toolset v130@8261bcc by General-101 (add-on for Blender 3.1.0 or newer to Import and Export the Halo .jms model and .jma animation files; the lite version worked fine for me): https://github.com/General-101/Halo-Asset-Blender-Development-Toolset/releases/latest
Addendum 1: Extracting Halo: Combat Evolved video game models, workflow
- Unpack the .CAB archives from the CD-ROM with a regular ZIP program;
- Put the shared bitmaps.map, sounds.map and ui.map files in a folder together with one the level .map file you want to extract from;
- Open the level .map file with Gravemind's Reclaimer to see a quick preview of the character, vehicle or weapon gbxmodel you want to extract;
- Use MosesofEgypt's Refinery tool (part of Mo's Editing Kit Essentials) to extract the gbxmodel into a .jms model file with its .jma animations and .dds texture images;
- Install the Halo Asset Blender Development Toolset add-on by General-101 in Blender version 3.1.0 or newer to Import a .jms model and then its matching .jma animations;
- Select a nice pose and Export the model as a Wavefront .obj model;
- Convert the .dds textures to .bmp images and assign them to the matching materials of the 3D model in your favorite 3D program;
- ...
- Profit!
Addendum 2: .map files level names and shared assets
In Cab1 archive:
- a10.map (Pillar of Autumn)
- a30.map (Halo)
- a50.map (Truth and Reconciliation)
- d40.map (The Maw)
Cab2 archive:
- b30.map (The Silent Cartographer)
- b40.map (Assault on the Control Room)
- beavercreek.map
- bloodgulch.map
- boardingaction.map
- In Cab3 archive:
- c10.map (343 Guilty Spark)
- c20.map (The Library)
- carousel.map (Derelict)
- chillout.map
- d20.map (Keyes)
- damnation.map
- dangercanyon.map
- deathisland.map
In Cab4 archive:
- bitmaps.map (textures; SHARED, make sure this .map is always in your working folder!)
In Cab5 archive:
- sounds.map (sounds; SHARED, make sure this .map is always in your working folder!)
In Cab6 archive:
- gephyrophobia.map
- hangemhigh.map
- icefields.map
- inifinity.map
- longest.map
- prisoner.map
- putput.map (Chiron TL-34)
- ratrace.map
- sidewinder.map
- timberland.map
- ui.map (user interface; SHARED, make sure this .map is always in your working folder!)
- wizard.map
No comments:
Post a Comment