Tuesday, March 31, 2020

How to extract the 3D model of a Mighty Pirate from Escape from Monkey Island (papercraft Guybrush Threepwood WIP)


I'm not a hardcore classic adventure gamer and I really only played LucasArts' Grim Fandango and the Curse, Escape and Tales from Monkey Island games. But I did really like them! 😉 So after Grim Fandango's Manny, I had to do a Monkey Island Guybrush papercraft as well of course. 🐵

The Escape from Monkey Island version was the first 3D Monkey Island, and I can (hopefully 😉) make it look as if he jumped directly from the computer screen onto my desk! And I can also make another tutorial about how extracted the actual game model from a game to use as reference, because you can papercraft a lot more characters from the game of course! 😃


NOTE BEFOREHAND: I'm using the Steam version of Escape from Monkey Island because that's what I have. Although I can't check to make 100% sure, the tools I use will probably work with the original PC CD-ROM game as well (I think the Steam version is just a repackaging of the original game files with some fixes to make the game run on modern computers anyway?)

ANOTHER NOTE BEFOREHAND: I'm using a Windows 10 Home 64-bits desktop computer, so that's the only operating system I can confirm this method works on. Also, sometimes I have to tell my antivirus software to ignore the extraction tools I use: only do so if YOU are completely confident that the tool can be trusted, and NEVER turn off your antivirus software completely!!


Extracting the 3D model and textures: EMI Model Viewer & GLXtractor

- Now as always: to extract the game models from a video game, you need the game (see the "NOTE BEFOREHAND" above). If like me you have the Steam version, you have to install the game first to find the needed .m4b art bundles in your Steam > steamapps > common > Escape from Monkey Island Program Files folder.


- I use Benjamin Haisch' EMI Model Viewer 0.5beta to open the model files inside the .m4b art bundles, which you can download from his Quick And Easy Software website. Unpack the .zip file to find the EmiMeshViewer.exe file inside.


- The EMI Model Viewer won't be able to extract the 3D data by itself. For that I used a tool called GLXtractor V 0.9.9 by Alexander Kaspar, you can still download it from an archived version of his website. GLXtractor is actually a graphical user interface (GUI) frontend for Eyebeam OpenLab's OGLE: the GLXtractor download includes the OGLE tool and basically makes configuring it a whole lot easier. 😉

- GLXtractor uses the same principle as 3D Ripper DX or Ninja Ripper only for OpenGL instead of DirectX9 applications; you need to run the model viewer through GLXtractor so that it can intercept the data to the model viewer to capture it.

- Start the GLXtractor.exe tool and on the first screen click the Choose App button and browse to where you saved and extracted the EmiMeshViewer.exe file (the application you want to extract from).

- On the Capture tab, make sure the Capture Textures checkbox is checked. Also make a mental note of the Folder where the capture results will be saved and of the Capture Shortcut keys (by default, it's ctrl+shift+f).

- IMPORTANT NOTE: On the Ogle Plugin tab, make sure Capture Texture Coords is checked. I left the other settings as they are. Now click the Start Application button to start the EMI Model Viewer.


- GLXtractor will automatically start the EMI Model Viewer. Choose File > Open bundle and browse to your Steam > steamapps > common > Escape from Monkey Island Program Files folder to open one of the .m4b art bundles. In the EMI Model Viewer you will then see a Files list of all the Escape from Monkey Island file types in that .m4b bundle that EMI Model Viewer can open.

- IMPORTANT NOTE: For the 3D model extraction to work, you need to select three matching files (all with the same name, like "guy" for Guybrush) in a specific order:
1st: a .meshb file (the 3D model)
2nd: the matching .sklb file (the skeletal information for the model)
3rd: a matching .animb file (the animation)
- Double-click on a .meshb file to select it in the viewer window (it looks like most of the textures are missing, but don't worry).

- Next, double-click on the matching .sklb file. This will show the skeleton of the model and also the textures will show correctly now.

- Lastly, double-click one of the matching .animb files to select it. Click the Play/Stop button to see the animation in action.


- IMPORTANT NOTE: GLXtractor will only extract the 3D data when the model is moving/being animated!

- While the animation is playing, press the Capture Shortcut keys you selected in the GLXtractor configuration screen (by default they are ctrl+shift+f) to have GLXtractor capture the textures and an .obj file of the model.

- Find the .obj file in the Steam > steamapps > common > Escape from Monkey Island Program Files folder with the .m4b bundle you captured it from.

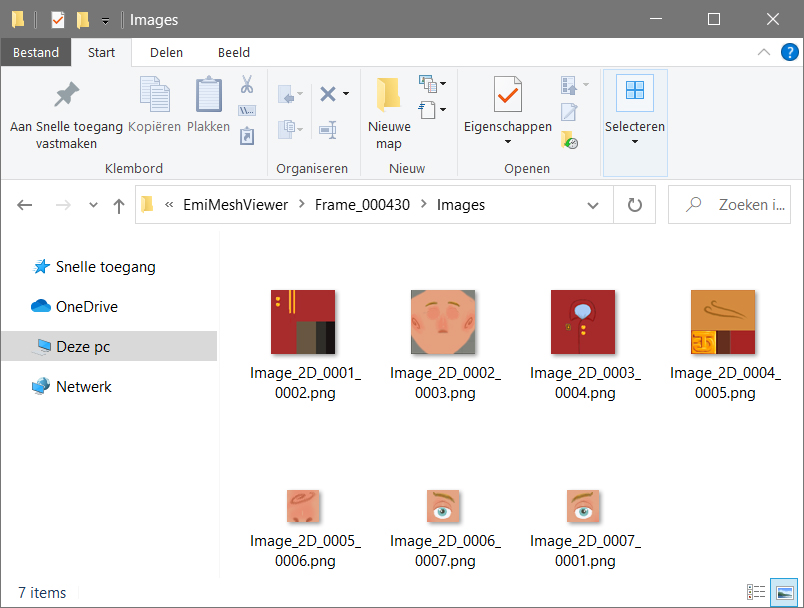
- By default, the textures will be saved as .png files in your My Documents > Xtracted > EmiMeshViewer > Frame_000430 > Images folder that GLXtractor created.


Fixing the textures in Metasequoia (or another 3D modelling program of your choice)

- This model extraction tutorial could be finished now, but I figured I'd also explain how to reassign the textures to model because there are some things that are useful to know doing this.

- Open the .obj file in your favorite 3D modelling program. I like to use Metasequoia because it works so well with Pepakura Designer that I will use to unfold the edited 3D Guybrush into a papercraft model, but you can use many other programs if you like those better.

- When opening the .obj file in Metasequoia, uncheck the Flip right and left and the Invert V of mapping options. (if you forget this, you can always manually mirror the 3D model from left to right and the .png files vertically afterwards to get the model and textures to look correct though).

- You will see that Guybrush is untextured right now and in the Material Panel (press CTRL+M in Metasequoia if you can't see it) there is only one material available for the model. GLXtractor extracted 7 .png textures though. For Guybrush, you will also need 3 extra materials: his teeth and ponytail bow need a solid white color (1), his chin and hands need a solid skintone color (2) and his boots a solid black color (3). I find it easiest to just create three new small image files with the appriate colors (I sampled the skintone from Guybrush's face so that it will match).


- Clone the first material in Metasequoia so that you have enough materials for each of the 10 textures you now have. Assign each of them to one of the different materials by double-clicking the materials and then under Mapping, click the Ref button next to the Texture box to browse to the .png texture files. You can also give the materials a more recognizable Name, which will make the next step much easier. 😉


- Now select one of the objects in the model in the Object Panel (press CTRL+Q in Metasequoia if you can't see it) so that it is highlighted.

- Then in the Edit commands, click the Sel Obj button (select the Modeling mode from the big pulldown menu in the top left if you can't see it). This will select the polygons (Metaseqioia calls them "faces") of the model that belong to the selected object.

- With the "faces" of the object selected, select the appropriate material/texture and assign it to those polygons by clicking Selected > Set material to faces. So for example if you see that object 2 is the object for Guybrush's sleeve cuffs and collar of his boots, you can select the polygons of object 2, select the material that has the .png texture file for Guybrush's sleeve cuffs and boots collar (if you gave the materials recognizable names you will be able to find them much easier!) and then set that material to those faces.

- Do this for each of the objects and materials/textures. Make sure to deselect the selected faces before moving on to the next object by pressing CTRL+D or you will assign the textures to the wrong objects!

- Object 1 is actually a combination of the objects with solid colors, so instead of using the Sel Obj option, click the Select command (or just press S), choose the Joined face option on the context menu and then you can click on Guybrush's boots for example to select all the Faces that are connected together and then set the black material to the selected faces.

- Once you've set the appropriate materials to all the separate objects, Guybrush will finally look alright again. 😃


- And there you have it: a 3D Guybrush to use as a reference for a new papercraft model! Guybrush's armpits are a bit messed up (I know, that's not so strange for a LucasArts adventure game character; but I mean on the 3D model 😉) but that's something I'll fix when I'll be working on making the 3D model suitable for papercraft. Stay tuned!


Tools used:
- Benjamin Haisch EMI Model Viewer 0.5beta: https://quickandeasysoftware.net/software/emi-model-viewer

- Alexander Kaspar's GLXtractor V0.9.9:
https://web.archive.org/web/20111115194033/http://members.chello.at/alexan/

- Metasequoia 4: http://metaseq.net/en/

If you liked this tutorial and want to save it, you can download the combined steps as this single image:


free papercraft Royal Thai Navy coastal defense ship HTMS Sri Ayudhya


The HTMS Sri Ayudhya was a coastal defense ship of the Royal Thai Navy. But did you know it can also be a papercraft on your desk or book shelf? 🚢

Well you couldn't have of course, because Thanadol just made it! 😉

Download + build your own free papercraft Royal Thai Navy coastal defense ship HTMS Sri Ayudhya (by Thanadol):
https://drive.google.com/drive/folders/1N_zK3YKJvM-sP5_N_b3Z51-uV5Yh1rUf

free papercraft Air Bound Gavin the mouse


You might know the Japanese animation movie Gamba and Friends by its English name Air Bound. Even though it's 5 years old, don't let that stop you from making this papercraft Gavin the mouse! 🐭


Download + build your own free papercraft Air Bound Gavin the mouse (by Gamba and Friends official movie site):
http://www.gamba-movie.com/news/

(download instructions: click the two PDF links next to the template thumbnails in the "2015.10.22" news post)

Saturday, March 28, 2020

Why I had to redirect the about 560 download links on my papercraft webpage (or: please let me know if you find any broken or faulty links ;o)


Above are just some of the 196 free papercrafts that I have for download on my papercraft webpage so far:


Most of them have:

  • A finished picture,
  • A parts file
  • An instructions file

(Except for my early ones, that don't have separate instructions, and some that have extra alternative or optional parts, and some featured models like repaints done by others).

So when my internet provider announced a while back that they will be closing the free webspace for their customers on April 1st (I don't think it's an April Fool's joke...? 😁) that meant I had to spend the last few days transferring the files that were on there to my Google Drive, and redirect the about 560 download links on my papercraft webpage...


So... although I did my best, you can imagine that I could have made some mistakes, so please:
let me know on ninjatoes@home.nl if you find any broken or faulty links! 😊


Have fun building!

Tuesday, March 24, 2020

Free papercraft Grim Fandango Manny Calavera release!


As a mix between the original 1998 Grim Fandango game model and the 2015 remastered textures, paper Manny turned out really nice!

Download free Grim Fandango Manny Calavera papercraft:

Have fun building!


Saturday, March 21, 2020

Right this way please... (papercraft Manny WIP)


Now with head! (well, skull actually of course... 💀)

So my final papercraft Manny is built! And I've already started the instructions, so if all goes well I can release him soon. Stay tuned!

Free papercraft 1950's Cemedine advertising car (until March 31st 2020...?)


Although I'd like for my papercraft weblog to become more the "Work In Progress" blog for my own original papercrafts that I originally created it for, you know me, I simply can not resist when a company creates a free papercraft to download from their website*...

And I have to share it now, because it might only be available until March 31st 2020 if I interpret Google Translate's results correctly...?

So why take the chance, just get this papercraft 1950's advertising car for the Cemedine adhesive manufacturing company now! (coincidentally, they recommend using the Cemedine quick-drying woodworking glue 😉)

Download + build your own free papercraft 1950's Cemedine advertising car (by Hamada Yoshiaki on Cemedine):
https://www.cemedine.co.jp/cemedine_reports/cemedinecar-papercraft.html

(download instructions: click the template previews on Cemedine's webpage for the PDF file)


* There's actually an intriguing story about how this papercraft came to be: Google Translate link

Friday, March 20, 2020

free papercraft Thanadol Class super ferry


In case you didn't know already from the previous posts, Thanadol really likes making papercraft ships! 🚢🙂

He showed me his newest papercraft ferry to share with you again; and it's a special one, because this time you can make your own "Thanadol Class super ferry" in a scale of 1:1100 and you can name it the MV Thanadol after Thanadol himself or the MV Larry, after Larry from Ceb's Model Ferries!

Download + build your own free papercraft Thanadol Class super ferry (by Thanadol):
https://drive.google.com/drive/folders/1Lu5KrNOtLI5AB4YL5BzJzEeIk-q17jAx

Thursday, March 19, 2020

Grim Fandango papercraft Manny final build


As you can see, I managed to get all of Manny's papercraft parts on just three sheets in a more or less logical (to me... 😇) fashion. Manny is not a very complex model, and with one or two exceptions he's pretty much just a collection of boxy pieces. 😊


I'm usually a bit ahead of my blogposts with my Works In Progress, and I already built most of the final paper Manny! It goes to show how much of a difference edge-coloring (and of course just some extra care in general as well) can make on a papercraft, especially one with darker colors. 🙂

Stay tuned for the finished paper Manny and the release!

Saturday, March 14, 2020

Grim Fandango papercraft Manny test build


So I already started the test build (and finished it 😉) of Manny from the last post. As I explained then, this is by no means the only or even best way of turning Manny into a papercraft of course! But although this is just a quick and messy test build, and I actually somehow (again) messed up the printing scale so he actually turned out smaller than I intended (18 cm, but I will make him a bit bigger) I'm pretty happy with the way he turned out. 👍

Manny is not a very hi-poly, detailed game model of course, but you guys probably know by now that I actually really like that look. From my previous Leon papercraft for example you can see that it is definitely possible to make smoother papercrafts, but this blocky style looks really good as a papercraft!


The hands went together very well too, even though they too were smaller than intended of course; Manny's scythe balances well in his one hand (I always try not to have to glue it on) and Manny's cigarette in the other, so so far so good. 😇 Stay tuned!


Tuesday, March 10, 2020

Remodelling Grim Fandango's Manny's skeletal hands for a papercraft


Another thing that needed attention on digital Manny to be able to make him into a paper Manny were his hands.

Manny being a skeleton💀, his fingers are just bones so they need to be quite thin. As you can see in the original model, they just used two small flat rectangles in a cross-shape to give them the appearance of being 3D fingers while keeping the polycount down for such tiny parts of the model.

Although you could really do the same with paper pieces, it would be pretty tricky because the parts would be so small already, and then you'd have to cut into them even more to slide the second part in, and how would you then attach the cross-shaped fingers to the hand without them easily falling off... I thought about remaking the fingers as tiny tubes, but again, the fingers will probably be so small on the paper model that it would be very difficult to do a decent job of assembling and gluing everything together.

So in the end, I decided to make the fingers really 2D; I feel its fits the simple nature of Grim Fandango's 90's 3D style and this way I can plan the paper hand to be easy enough to build and plenty strong for this papercraft.

For the same reason, I decided to close off Manny's sleeve instead of showing his radial and ulna bones. Trying to make a paper model with those pieces would only complicate things while not really adding anything that interesting to a paper model of Manny in his suit. 🦴

I hope this shows that there is no right or wrong in making a papercraft model: I rarely keep a video game model as it is, while others want to keep all the extra detail in. The great thing about making your own paper model, is that it's all about the way you like it: have fun! 🙂


Saturday, March 7, 2020

The thing with papercrafts from video game models... (Manny WIP)


Is it easier to make a papercraft from a video game model? Well it gives you a good head start! And you can make it look as if the paper model jumped directly from the video game onto your desk! Well... sorta.

Because you will probably have to remodel it; the main issue with video game models, is that especially around their joints and limbs, they have no issues with collisions, sliding their shoulder and elbows into their arms and torso for example... A lot of the work on the 3D model for papercraft is fixing these collisions, but that's really not as difficult as it sounds!

Since you're not making a model for a video game that needs to move in a realistic way but for a static papercraft, you can just treat it as a still statue and connect all the joints in a way that just looks nice to you and that seems simple enough to assemble in paper (and of course you can always test build that 😉). More often than not, this will mess up the texture mapping though, so that's another issue that you create then and need to fix. 😛


And speaking of textures: remember how I could only find a gray version of Manny's shoes while the textures from the original version were brown? I decided to fix that too, even though as you can see it's not that big of a change because they're quite dark (but for some reason it stuck in my head that it was really important 😝).


  Stay tuned for more updates!

Wednesday, March 4, 2020

Strike a pose Manny, any pose! ...no not that one, another one!


With all that work capturing Manny in a nice pose from the game, to be honest I found him a bit stiff (some pun intended 😝) and I kinda really wanted him to have his scythe...

So I decided to create my own pose; and really, I did that just by rotating his arms and body and things a bit and moving them to get them in the right position, nothing fancy with rigging the skeleton (some pun... you know 😉) or anything.

I think he just looks a bit more interesting this way. Manny's 3D game model doesn't look too complicated really so I think he will make a really nice papercraft! As always, there are a few quirks, like his shoulders and elbows need to be remodelled so the paper parts will actually be connected together, but nothing I haven't done before on pretty much every video game character papercraft I made so far, so stay tuned to see me do it again... 😛