Sunday, November 29, 2020

FREE papercraft Tetra (The Legend of Zelda: Phantom Hourglass) RELEASE! :o)


To do:
  1. Build paper Tetra (while taking pictures for the instructions)
  2. Make instructions (...using the pictures I will take while building Paper Tetra 😜)
  3. Take some pictures to show finished Paper Tetra
  4. Make a release video that only I will find funny 😊
  5. Put the parts and instructions on my papercraft webpage for free download!
Well that's that! Paper Tetra took a *looong* time to make (I started in August/September already!) because it's been a busy period - and because I wanted to make a new Halloween papercraft in between of course. 😉

But I managed to do it, and now you can get your own Paper Tetra for free:

Download + build your own free papercraft Tetra:


I don't know which papercraft I'll make next, and like I said, it's quite a busy period so it may take a while again. But in the meantime, I hope you like Paper Tetra! ⏳😊

Have fun building!


free Phantom Hourglass Tetra papercraft WIP 12: getting real close! ;o)


To do:
  1. Build paper Tetra (while taking pictures for the instructions)
  2. Make instructions (...using the pictures I will take while building Paper Tetra 😜)
  3. Take some pictures to show finished Paper Tetra
  4. Make a release video that only I will find funny 😊
  5. Put the parts and instructions on my papercraft webpage for free download!
You probably noticed I'm really trying to release Paper Tetra today. 😊

So I kept the video simple (as if my other release videos are cinematic masterpieces... 😜) and I'll set up the free downloads for the parts and instructions on my papercraft webpage in a moment! 😉

Stay tuned! 😉

free Phantom Hourglass Tetra papercraft WIP 11: taking pictures and meeting friends


To do:
  1. Build paper Tetra (while taking pictures for the instructions)
  2. Make instructions (...using the pictures I will take while building Paper Tetra 😜)
  3. Take some pictures to show finished Paper Tetra
  4. Make a release video that only I will find funny 😊
  5. Put the parts and instructions on my papercraft webpage for free download!

Paper Tetra was very interested in my photocamera! 📷 And she got to make some friends. 😊


Stay tuned! 😉


free Phantom Hourglass Tetra papercraft WIP 10: another step closer to release :o)


To do:
  1. Build paper Tetra (while taking pictures for the instructions)
  2. Make instructions (...using the pictures I will take while building Paper Tetra 😜)
  3. Take some pictures to show finished Paper Tetra
  4. Make a release video that only I will find funny 😊
  5. Put the parts and instructions on my papercraft webpage for free download!
Stay tuned! 😉

Saturday, November 28, 2020

free Phantom Hourglass Tetra papercraft WIP 9: final build! :o)


To do:
  1. Build paper Tetra (while taking pictures for the instructions)
  2. Make instructions (...using the pictures I will take while building Paper Tetra 😜)
  3. Take some pictures to show finished Paper Tetra
  4. Make a release video that only I will find funny 😊
  5. Put the parts and instructions on my papercraft weblpage for free download!
Stay tuned! 😉

Sunday, November 22, 2020

free Phantom Hourglass Tetra papercraft WIP 8: just a few more steps!


It's been a while since starting this Tetra papercraft (mostly because of other things coming in between) but I'm getting closer to finishing and releasing her!

The final templates are finished (well, sometimes I still end up making some changes before the release) as usual in Photoshop so I can fix any textures and clean up some parts that are just so much easier to fix on the 2D template than to keep trying to get the 3D model perfect (yes, I cheat like that when making papercraft templates 😜)

I always try to put the parts on the sheets that make sense, like placing the legs below the pants, the torso above the pants, the arms each on the correct sides of the torso and things like that. And I always number the parts in the order that I assemble the papercraft in.

For some parts that I feel could need some extra directions, I like to add some arrows and letters showing which glueing flap connects to which edge. There'll be step-by-step instructions as well of course, and usually people seem to manage putting these together better than me! 😀

As you can see, I managed to get all the parts on just two sheets (Tetra is a bit smaller than Linebeck after all), so that's nice!

I decided to use a fun bubbly font for the title, because although Tetra acts all tough and fearsome, I think that's just an act because she thinks her pirate crew wouldn't respect her otherwise after having to take over as captain after her mother died, but she's really just a young, kind-hearted cute girl inside. 👧

So now that the final templates are ready, there are just a few more steps to finish the Paper Tetra Project:
  1. Build paper Tetra (while taking pictures for the instructions)
  2. Make instructions (...using the pictures I will take while building Paper Tetra 😜)
  3. Take some pictures to show finished Paper Tetra
  4. Make a release video that only I will find funny 😊
  5. Put the parts and instructions on my papercraft webpage for free download!
            So stay tuned! 😉

Friday, November 20, 2020

free Phantom Hourglass Tetra papercraft WIP 7: the final touches before the final version!


Just a quick update that I managed to do during the week before I start unfolding (and maybe even building...?) the final version of my papercraft Tetra this weekend;

I decided to add Tetra's sword and small bag to the model! Tetra herself went together nice and quick, so I felt like giving the papercraft a little bit extra.

I think Tetra doesn't actually appear with her sword and small bag in The Phantom Hourglass, so I used the ones from the Wind Waker version. Of course I simplified them a bit to fit Phantom Hourglass style. 👻⌛

I think it looks pretty nice! 🙂


Oh, and as a bonus, here's a size comparison of the test build and paper Linebeck that I made in 2011 (!) and that's already available free for download from my papercraft webpage:


Stay tuned! 🙂

Sunday, November 15, 2020

free Phantom Hourglass Tetra papercraft WIP 6: first test build

Yay, Tetra *finally* made it into paper! As a test build first of course, so it's pretty messy. But I think she looks pretty nice and putting her together went pretty well and fast too! 🙂

I think with a few small tweaks she'll be ready for finalizing, stay tuned!


Saturday, November 14, 2020

free papercraft Kamiichi Town Tsurugi-kun mascot character


You've seen enough cute Japanese town mascots by now to know that they always symbolize the town they're from;

So looking at Tsurugi-kun, you can tell that there must be some snowy mountains and nice flowers near Kamiichi Town! 🗻🌺😊


Download + build your own free papercraft Tsurugi-kun mascot character (by Kamiichi Town):


free State Railway of Thailand KiHa 58 series train car by Thanadol Group


Well? What do you think of Thananadol Group's newest papercraft? 😃

It's a KiHa 58 series train car, operated by the State Railway of Thailand; I think it has a nice color scheme, and Thanadol Group added some nice graphic details and pieces! 🚃

Download + build your own free KiHa 58 series train car (+lots more, by Thanadol Group):


Sunday, November 8, 2020

free Phantom Hourglass Tetra papercraft WIP 5: first test build unfold


Yay, I can finally start Tetra's test build like I planned three weeks ago! 😉

With actual life and absolutely having to finish and release my Halloween 2020 papercraft in time of course, it took me a while, but at least I managed to unfold the 3D model for the test build;

The test build is of course to check if all the parts fit together in paper form, and whether the paper model will look like 'game Tetra'.

But it also gives me an opportunity to try out different ways of unfolding certain pieces and glue flap positions and see which way I like better. I can also try out different line colors, which even when they're very noticeable in Pepakura Designer and in the final PDF file, end up being quite difficult to see on the printed version...

Especially with more or less symmetrical parts, I can compare different options in one test build and see which I like best for the final version! 😀

The only thing is, now I will have to find the time to build the test build... 😆

Stay tuned!

Saturday, November 7, 2020

Extract 3D models from Warcraft III as base models for Halloween papercrafts! (well, for any occasion really of course ;o)


I never really got into the online World of Warcraft craze, but I did really like the style and gameplay of the original WarCraft III: Reign of Chaos game!

And when I found out you could extract the 3D models from the game, I realized they could be made in some really nice papercrafts! (especially for Halloween 🎃) 

download my papercraft Halloween 2020 Warcraft 3 Spiders for free:


● NOTE beforehand: MPQ vs CASC game container files

- As you can see, I'm using the original CD-ROM version of Warcraft III: Reign of Chaos (build 1.21b) from a time when Blizzard stored their game data in .mpq container files that can be explored with the Warcraft 3 Viewer v2.3c tool by David TheProhet;

- But since the v1.30 build 9655 build (and the 2020 remastered Warcraft III: Reforged version)  the game container format was changed to CASC (Content Addressable Storage Container) which won't work with the Warcraft 3 Viewer!

- However, you can try the Cascview tool by Ladislav Zezula (http://www.zezula.net/en/casc/main.html) which should work very similarly as the Warcraft 3 Viewer I'll be using in this tutorial.

IMPORTANT NOTE: when I tried out CascView, I had to set my antivirus software to ignore the tool or else it would think it was a malicious program and prevent it from running: only do this if YOU are 100% certain that the file is not malicious and NEVER turn off your antivirus tool completely!


● Extracting the 3D model from the Warcraft III .mpq container files (Warcraft 3 Viewer v2.3c)

- First, install the Warcraft III game on your computer, because the Warcraft 3 viewer tool will use the .mpq files from the Program Files folder it creates after it's installed.

- Now you need David TheProphet's Warcraft 3 Viewer v2.3c tool, which you can still download from an archived version of his website (get the OpenGL version by clicking the "Latest version here" link):

(if the archived link doesn't work anymore, download the tool from the Hive Workshop for example: https://www.hiveworkshop.com/threads/warcraft-iii-viewer.62878/)

- After unzipping the downloaded package, run the Warcraft 3 Viewer.exe executable.

- When you run the tool for the first time, a window will pop-up allowing you to locate the .mpq container file that you want to use (the main war3.mpq file is in the installation folder for Warcraft III, by default C:\Program Files (x86)\Warcraft III).

- Once you've selected the .mpq file you want to use, the actual tool will open: a Treeview window and the Warcraft 3 Viewer v2.3c main window.


- Expand the Treeview list by clicking on the little [+] plus signs.

- Keep going until you find the model you want to extract, like a Building like the Undead Graveyard, or in this case, a Units > Creeps > Spider...

- Expand the Treeview list until you can see the Spider.mdx listing. Select it and you will see the model in the main Warcraft 3 Viewer window.


- Now in the main Warcraft 3 Viewer window, choose Current File > Extract MDX...

- Choose a location to save the .mdx file to and click save. If all went well, the Warcraft 3 Viewer will tell you that the MDX was successfully extracted.


- To extract the textures, choose Current File > Extract (and convert) used textures...

- In the Extract (and convert) used textures Options, make sure all the .blp texture files are selected, and then click the small [...] button next to Extract to :

- Select the location where you want to save the texture files (like the same folder where you extracted the MDX).

- To make things easier in some programs, choose the 32 bits Bitmap (BMP) option in the Convert to dropdown list.

- Then click OK and if all went well again, the Warcraft 3 Viewer will tell you Extraction done.


- Now if all went well, you will find the .mdx file, and folders with the converted .bmp texture image files in the folder where you chose to save them:


OPTIONS: Now you have to convert the extracted .mdx file to a more common file format so that you can remodel it in a 3D program to get it ready to make a papercraft out of it. The free option would be Blender, the best option would be 3DS MAX but (and maybe the easiest option would be MilkShape 3D)


● Free option: Open and convert the Warcraft III MDX model in Blender 2.79b (Blender_WarCraft-3 plugin by Pavel_Blend; without animations, but free)
NOTE: I like to use an old version of Blender (2.79b: https://www.blender.org/download/releases/2-79/) because newer version excluded the option to import .3ds files (the plugin I used should work with other versions too though, so feel free to try whichever version you have/like first)

- To import the extracted .mdx file into Blender you will need a special Blender_WarCraft-3 plugin by Pavel_Blend which you can get from his GitHub page:

- Click the green Code button and then choose to Download the code as ZIP.

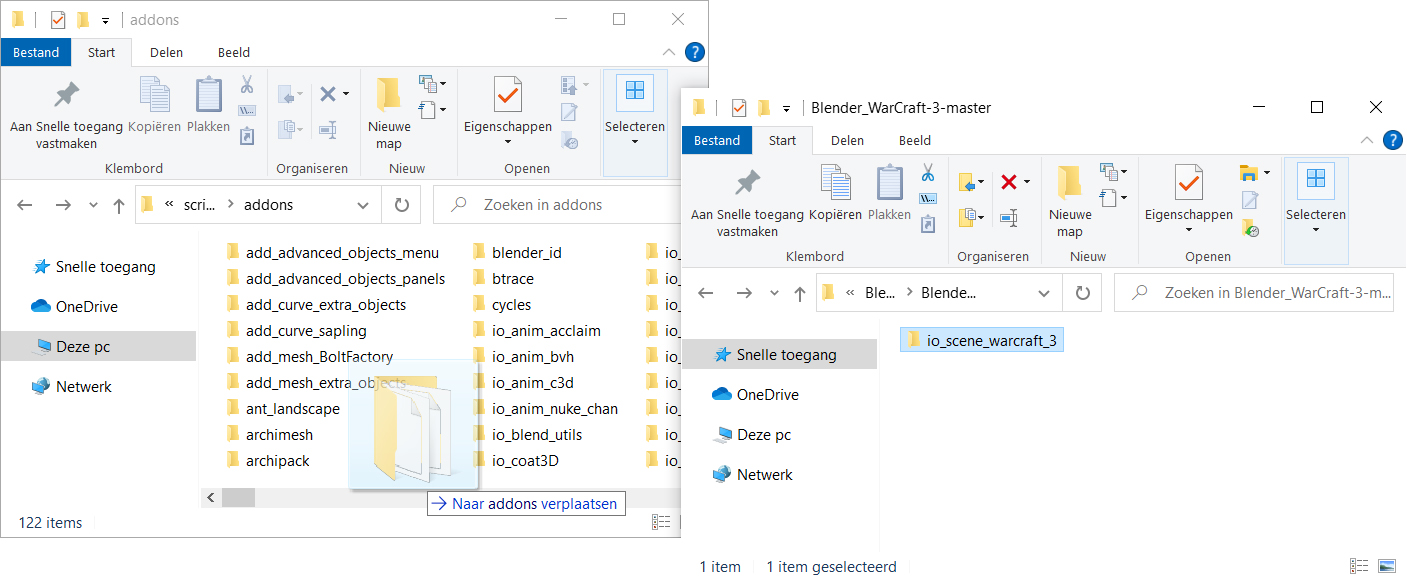
- Unpack the .zip file, and then copy+paste the io_scene_warcraft_3 folder to the Blender's scripts addons folder (by default it should be at C:\Program Files\Blender Foundation\Blender\2.79\scripts\addons folder).

- Now start up Blender. Before you can use the Pavel_Blend's plugin, you have to activate it:

- Open the File menu and choose User Preferences...

- Go to the Add-ons tab and scroll down until you see the Import-Export WarCraft 3 plugin.

- Place a checkmark in the [ ] box next to the name, and DON'T FORGET to click the Save User Settings at the bottom!

- Now go to the File menu again and now choose Import and there will be new option available: WarCraft 3 (.mdx).

- Browse to the location where you saved the extracted .mdx file and import it; it will probably be quite big so zoom out a bit to see if it's correct.

- Unfortunately, Pavel_Blend's plugin doesn't seem to let you view the animations from the .mdx file, but the default poses for the Warcraft III models are not too bad (and you can always change it anyway while you remodel them for papercraft of course).

- Now you can go to the File menu again and choose Export to export the Warcraft III 3D model to a more common 3D file format, like Wavefront (.obj).


● Best option if you have it: Open and convert the Warcraft III MDX model in 3DS MAX (3DS MAX MDX Import/Export Plugin v2.03 by Philip Laing; with animations)

- If you're fortunate enough to have access to 3DS MAX, you could also use a special MDX Import/Export Plugin v2.03 by Philip Laing that was updated to work with newer versions of 3DS MAX by NiNtoxicated

- The big advantage of using this method is that this plugin will allow you to view the animations embedded in the .mdx file in 3DS MAX so you can export the 3D model in a pose different than the default one!

- Download and unpack the plugin:

- First you have to load the script in 3DS MAX; I still use my old but trusty 3DS MAX 9, and in that version you can choose the MAXscript menu, Run Script... and then select the impedexpmdx v2.0.3.ms script file and Open it.

- Now open the Command Panel (right-click on the menu bar and make sure there's a checkmark next to Command Panel) and go to the Utilities tab (the one with the with the Hammer icon).

- Choose Maxscript, and now that the MDX Import/Export Plugin is loaded, you can choose the MDX Importer/Exporter option in the Utilities dropdown list.

- Scroll down a bit if necessary until you can click the Import MDX button.

- Then browse to the location where you extracted the .mdx file and Open it.

- Now in 3DS MAX, you can slide the animation bar to select a nice pose for your papercraft.

- Once you've selected a nice pose, choose File > Export and export the 3D model to a more common file format like Wavefront Object (*.OBJ) again.


● Easiest option: MilkShape 3D (pre-installed plugin, but without animations and only free as a 30-day trial)

- Another alternative would be MilkShape 3D 1.8.4 by Mete Ciragan which comes with a Warcraft III MDX Importer v1.1 by UniKorn already included (but it can't use the animations of the .mdx...): http://www.milkshape3d.com/

- In the File menu, choose the Import > Warcraft III MDX ... option (it's one of the last options in the LONG list of game file formats that Milkshape 3D can open)

- Browse to the .mdx file you extracted with the Warcraft 3 Viewer tool by clicking the button with the two >> arrows next to the Filename box and click OK.

- You'll get some errors about Milkshape not being able to open the .blp textures, but that's just because you converted them to another easier to use file format for later on (Note: you could have chosen not to convert the .blp files, but you'd have to do it some point anyway since most regular 3D programs and Pepakura Designer won't be able to work with .blp texture files).

- Ignore the warning by clicking OK, and the 3D model will load.

- Again, you won't be able to view the animations, but you can export the 3D model in the default pose by choosing File > Export > Wavefront OBJ...


Now you will want to re-assign the textures to the 3D model to make it look all nice again (if you're not making a Spider at least ;o). I'll use Metasequoia as usually because that's what I always use to remodel game models to make them into papercrafts, but you can use any 3D program you like if you exported the model and textures in a file format that the program can open of course.


Open the Wavefront .obj file in Metasequoia and assign the textures

- Open the exported .obj file in Metasequoia; in the OBJ Import options, DON'T check the Flip right option, but DO CHECK the Invert V of mapping box.

Double-click one of the Materials in the Material Panel (press CTRL+M if you don't see the Material Panel) to open the Material Property window.

- In the Mapping section you will see the name of the texture image file that should be assigned to that material.

 - Click the Ref button next to the Texture image file name to browse to the texture files you extracted (and converted) using the Warcraft 3 Viewer.

Open the matching texture image file (even if you converted them as .bmp files instead of .png).

Do the same for the other Materials (note that different Materials can use the same texture image file) and then click OK to close the Material Property window and finally see the textured 3D model! 😀


Now you can start remodelling the game model to make it in a model suited to unfold in Pepakura Designer! (or you can just download the papercraft Warcraft III Spiders I made for this year's Halloween) 

Have fun! 😊


● Tools used:
- Warcraft 3 Viewer v2.3c by David TheProphet: https://web.archive.org/web/20060117061640/http://www.xeberon.net/view.php?id=125 (get the OpenGL version by clicking the "Latest version here" link); alternative download location: https://www.hiveworkshop.com/threads/warcraft-iii-viewer.62878/)

- Blender 2.79b: https://www.blender.org/download/releases/2-79/ (the newer 2.8x versions don't seem to have a .3ds import option anymore; so it's your choice whether you really want the latest version)

- Blender_WarCraft-3 plugin by Pavel_Blend: https://github.com/PavelBlend/Blender_WarCraft-3


● (alternatives)
- 3DS MAX MDX Import/Export Plugin v2.03 by Philip Laing: https://www.sc2mapster.com/projects/m3-export-plugin-3ds-max/files/435851 (alternative to the Blender plugin to import the extracted .mdx files from the Warcraft 3 Viewer WITH animations in 3DS MAX)

- Milkshape 3D: http://www.milkshape3d.com/ (comes with a Warcraft III MDX Importer v1.1 plugin by UniKorn included, but doesn't work with the animations either and is only free for the first 30 days)


- Casc Viewer v 2.3 by Ladik: http://www.zezula.net/en/casc/main.html (alternative to the Warcraft 3 Viewer for newer versions of Warcraft III that use CASC container files instead of .mpq ones; you may have to tell your antivirus software to ignore the Casc Viewer tool: only do this if YOU are 100% certain that the file is not malicious and NEVER turn off your antivirus tool completely!) 


Condensed version of this Warcraft 3 model extraction tutorial, in one *big* image: