Although it's called 'papercraft', I've used different materials before, like 'metallic' / 'mirror' sheets, even some glow-in-the-dark sheets (it turned out to sticker sheets when I received them after ordering them 😝 but it still worked) and of course plastic transparancies. 😊
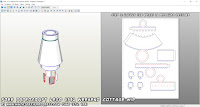
I've had a little more time this week to work on making the instructions and figuring out a nice way to organize the templates and everything for the release of my papercraft LEGO set 6592 Weekend Cottage!
Most papercraft LEGO Bricks aren't too difficult to assemble really, since they're basically just a bunch of rectangles and cylinders of course, and paper is really easy to work with, folding and gluing it together.
The transparant parts however can be a bit tricky. Before, I used printable transparancies, so I could print color onto the sheet just like a 'normal' papercraft part. And since I did the cutting by hand, I could VERY gently score the fold lines with as little pressure as I liked.
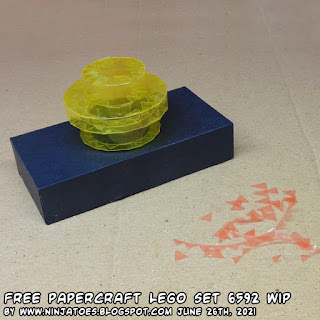
This time though, I was able to find some colored transparancies in the color(s) I wanted, so I didn't have to print the Transparant Yellow pieces that you need to make the lights of the Cottage! 💡😀
When using a cutting machine like the Silhouette Cameo 4 though, you REALLY have to be careful scoring the parts and then folding them along the scored lines... I used the lowest settings (cut depth 1 and pressure 1) and still sometimes it went too deep and then when I tried to fold the parts the plastic sheet would snap along the 'scored' fold line...
There's not much to do about that, since plastic isn't really suited to be scored like paper is... But an alternative would be to change to solid / continuous lines to dashed lines; that way there will always be some parts of the lines that won't get cut / snapped, while the (partially) 'scored' line will guide you folding it in the right place and in a straight line! 🙂
The next problem of using transparant, plastic sheets to make papercraft parts is gluing them together; gluing together paper is easy and it's easy to find glue that can glue paper, but for gluing plastic sheets, you would really need some special glue, and usually those kinds of glue either:
- Just won't work very well if the part is under tension (like gluing cones or cylinders, that naturally want to pull apart);
- Or it will work SO well, that you don't have time to move around the pieces anymore to fix a small misalignment for example if you didn't align them perfectly as soon as you put them together...
So in the past, I used doublesided tape for putting transparant, plastic parts together. It takes some extra time and effort, because basically you have to apply the doublesided tape to the gluing tabs, then usually cut it to match the gluing tabs (which takes extra work if there all a lot of small tabs like on cylinders...), then remove the backing and then carefully align the part to 'glue' to be attached to the gluing tabs.
With the tape I've been using so far though, especially when there really was a lot of tension in the parts, the parts would still come apart a bit too easily... 😐
But for this project, I tried a different kind of doublesided tape: Crafter's Companion Red Liner Tape! 😀
It's really a lot stronger than the tape I used before, and despite it looking red, that's just the backing of the tape that you peel off. The tape itself is actual crystal clear so you hardly see it when the part is assembled!
It works really well, and if you're able to get it, I really recommend it for this kind of thing! 😊
And now, back to finishing the templates and instructions for the release of the papercraft LEGO Weekend Cottage. 😉
Stay tuned!


