So far, extracting a video game model from games like
Kingdom Hearts,
Grim Fandango,
Escape from Monkey Island or the
classic Tomb Raiders to use as base reference for papercraft included many different steps...
For
Final Fantasy IX however, a fan called tasior2 made a great
FF9 online viewer with export feature, called
Reverse FF9 which can open and export the game files directly from the discs!
(NOTE: optionally, you can use the Steam version to extract the characters along with some higher resolution textures, although it is quite a bit more work...!)
● Extract the character model and textures from the PlayStation version (Reverse FF9)
- Model viewers or model extractors
don't include any game files themselves: you need to have the actual game of course to extract the models from it!
(in this case the PlayStation version) 🎮
- tasior2's originally created
Reverse FF9 as an online viewer; this online version actually still works as an
archived version, but to be safe for the future, you can download a backed up offline version by Chev in tasior2's original
Qhimm.com forum thread:
link (in Reply #49 at the bottom of the second page)
- Unpack the ZIP-file to find a
reverse_ff9.html file. Double-click it to open this offline version of tasior2's Reverse FF9 viewer in an internet browser window.
- Insert one of the Final Fantasy IX PlayStation game discs in your disc drive, then Click to load FF9.IMG file, browse to the
FF9.IMG file on the game disc and open it to load the files in the viewer
(this might take a minute).
- To extract a character model, go to the
Playable characters tab, choose a
Character in the Characters list and then one of the matching
Animations that you like
(remember its number!).
- You can drag the 3D model around with the right mouse button, rotate it with the left mouse button, and zoom in and out with the mouse wheel so you can get a good look first.
- Now click the
Export/Options bar on the right to see the Export/Options. Click the
Export button to save a
ZIP-file with a collection of
Collada .dae files for each of the animations and the matching textures as
.png image files inside.
- Now open
Blender (or another 3D application that can open Collada .dae files with their animations) and choose
File > Import > Collada (Default) (.dae) to import the .dae file with the number of the animation you like.
- The model will be upside down but that's okay. With the
animation slider at the bottom of the Blender screen you can select a specific frame and pose that you like best for the papercraft you want to make.
- Once you found the pose you like, choose
File > Export > Wavefront (.obj) to export the 3D model as a Wavefront .obj file. This will also automatically create a .mtl file, that tells the .obj file where to find and how to apply the .png file textures.
● Open and prepare the extracted 3D character for remodelling (Metasequoia)
- I like to use
Metasequoia for modelling for papercraft because it's perfect compatibility with
Pepakura Designer (the program I use to unfold the 3D model into 2D papercraft parts).
- In the
OBJ Import dialog window when opening the exported .obj file in Metasequoia, UNcheck the option Flip right and left, and CHECK the Invert faces and Invert V of mapping options.
- Then in Metasequoia, double-click one of the
materials (press Ctrl+M to open the Material panel if it's not showing) to open the
Material Property window.
- Under
mapping, click the
Ref button next to the
Texture box to browse for the matching .png texture image file. Now Beatrix will look alright again - except she's upside down...
- Press
Ctrl+A to select the entire 3D model, then choose
Selected > Mirror, and in the
Mirror dialog box choose the
ZX option to mirror the 3D model vertically
(you can delete the original upside down 3D model after that of course).
Now if you just want to papercraft a character, you're done already! 🙂 tasior2's
Reverse FF9 viewer is probably the easiest way to extract a 3D character model from the PlayStation version of Final Fantasy IX. Extracting the weapons too is a bit more work I'm afraid...
● Extract the Weapons from the PlayStation version (Noesis)
- Unfortunately, when you go to the
Weapons tab in Reverse FF9, you will find that you CAN view the weapons like Beatrix's Save The Queen sword, but exporting it doesn't work... 😟
- To extract a 3D model of the weapons, you can use Rich Whitehouse's
Noesis tool however
(you can actually also export the character model using Noesis, but you'll see it's A LOT more effort...).
- Unpack the ZIP-file and run
Noesis.
(IMPORTANT NOTE: I needed to tell my antivirus software to ignore the Noesis folder, or else it would delete the Noesis.exe executable thinking it was a malicious program. Only do so if YOU trust the tool, and NEVER turn off your antivirus software completely!!)
- Use the file tree on the left side of the Noesis window to browse once again to the
FF9.IMG file on the Final Fantasy IX PlayStation game disc.
- Now choose
File -> Export, and in the
Export Container File window in the
Destination file(s) box, choose a folder and a prefix for the folders that Noesis will export
(make sure the destination folder is NOT on your PlayStation game disc of course!)
- Click
Export, and Noesis will ask
Would you like to recursively unpack .ff9db files? You can choose
No here because you don't need all the files and it will be A LOT quicker.
- Exporting the files inside the FF9.IMG container file can still take a while, so be patient. Once it's done, you will see that Noesis created 14 directories (
dir00 through
dir13) with a lot of
.ff9db files inside.
- Each directory contains different type of game data. For a complete list of which directory contains what you can have a look at
Addendum 1 at the end of this tutorial, or go to the
Qhimm.com forum thread where I got it from:
http://forums.qhimm.com/index.php?topic=13145.msg182978#msg182978).
- For the weapons, use the folder tree in Noesis to browse to the newly created
dir08 and you will see a list of 84 .ff9db files. To make it easier to find the weapon you want to extract, I made a list of which you can find in
Addendum 2 at the end of this tutorial.
- As you can see in the list I made, I found Beatrix's
Save The Queen sword in
file0014.ff9db. Select it and choose
File & Export to export the contents of this container file.
- Now you're still not done: the files that Noesis exported are just
new .ff9db files, so use the file tree again to browse to the newly created
file0014_files folder, select the
dbfile0000.ff9db file and once again choose
File & Export.
- Now
FINALLY, browse to the new
dbfile0000_files folder using the folder tree in Noesis and you will find a
.ff9mdl file that is the actual 3D model for Beatrix's Save The Queen sword.
- Double-click the .
ff9mdl file, and Noesis will ask you to select a matching
animation. In this case however, you can simply select
Cancel and finally the 3D model will be shown in the Preview window.
- Even though the textures aren't correct, choose
File > Export again, only this time you can choose to export the 3D model as an
.obj - WaveFront OBJ file in the
Main output type dropdown list. You can also choose a more convenient destination folder and filename in the
Destination file(s) box.
- Noesis will ask you about an animation file again which you can ignore again, and then you will finally find the exported weapon as an
.obj file in the destination folder you specified. Noesis will also automatically export the matching texture image as a
.png file.
● Add the Weapon model to the Character model in Metasequoia
- Now go back to the
Metasequoia file with Beatrix. Choose
File > Insert and browse to open the weapon
.obj file you just exported with Noesis.
- This time in the O
BJ Import dialog window, under size change multiply to 0.01 x 0 Digit
(play with this scale until the imported weapon model matches the character model). Also, this time UNcheck Flip right and left, UNcheck Invert facesand UNcheck Invert V of mapping.
- After importing the new object, open the
Material Property Window again and set the newly exported .png texture image file to the newly created material.
- Unfortunately, the texture will still not be correct.
Hide Beatrix by clicking on the
two eyes 👀 next to her object in the
Object Panel (press Ctrl+Q if you can't see the Object Panel) and then press
Ctrl+A to select the entire Save The Queen sword.
- Now select the object and material for the Save the Queen Sword in the Object and Material Panels so that the names are highlighted.
- Switch to
Mapping mode in the large dropdown menu at the top left
(or by pressing Ctrl+Shift+P). You can see the problem with textures, namely that the polygons / faces are not aligned properly with the texture
(if you don't see the texture image or the UV map, then you probably don't have the correct object or material selected in the Object or Material Panels).
- With the
Move tool under the
Command tool group in
Mapping mode, you can pick up the corner points of the UV map, and
drag all of them around so that the texture is aligned properly again onto the 3D model
(you have to be very precise selecting the cornerpoints!)
Now you finally have a correct 3D model of
Beatrix with her
Save The Queen Sword!
(and hopefully now you understand why I used Reverse FF9 instead of Noesis to extract the character first... 😉)
● Extracting higher resolution textures from the Final Fantasy IX 2016 Steam version
- Now you can stop here or go a step further, and try to extract the
higher resolution texture versions from the
2016 Steam version of Final Fantasy IX with improved graphics.
- For this, you will need the
Hades Workshop v0.41c tool by Tirlititi:
http://forums.qhimm.com/index.php?topic=14315
- Unzip the package, then run the Hades Workshop tool and choose
Tools > Unity Assets Viewer.
- In the Unity Assets Viewer window, choose
File > Open and then browse to Steam's Final Fantasy IX installation folder to open the
FF9_Launcher.exe executable
(by default it should be C:\Program Files (x86)\Steam\steamapps\common\FINAL FANTASY IX)
- Now choose Archive > Streaming Assets and select the
p0data4 archive
(this archive contains the 3D characters, accessories, monsters and texture data; it can take a moment because there are A LOT of files...!)
- To make it easier to find what you're after,
double-click the Infos column header so the assets are sorted alphabetically by their Infos.
- For the new textures, you're looking for the
Texture2D for the sub model [character name] Infos.
- Select the Texture2D assets for the character you want, then
right-click them and select
Export Selection.
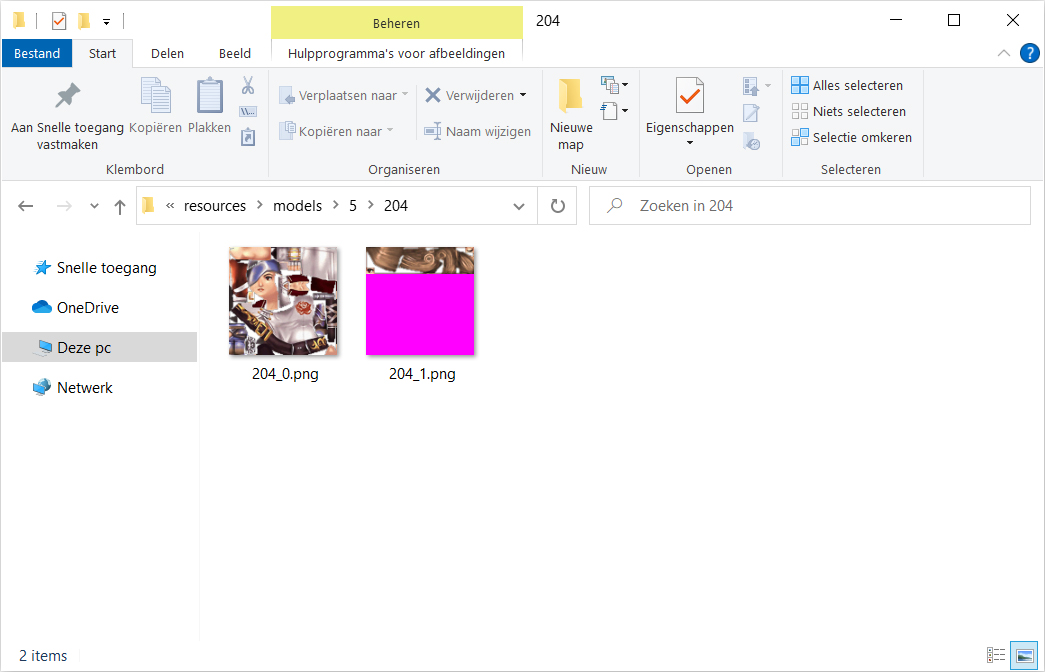
- This will automatically convert the selected Texture2D assets and save them under a whole bunch of HadesWorkshopAssets sub folders in the Steam installation folder of the game
(C:\Program Files (x86)\Steam\steamapps\common\FINAL FANTASY IX\HadesWorkshopAssets\p0data4\assets\resources\models\5\204)
- Now if you compare the
2016 Steam textures with the ones from the
2000 PlayStation version, you will see that indeed they are larger, but they are also laid out a bit differently
(they actually come from a different, much more detailed 3D model!).
- So if you try to assign the higher resolution textures like this to the 3D model extracted from the PlayStation version, the textrues will look all messed up because they aren't applied correctly...
- To fix this, I created two new textures files using the textures from the Steam version, but laid out like the PlayStation version so they will match the
texture maps just like the old textures. 😊
- And with these new texture files applied to the 3D model in Metasequoia, I think Beatrix looks much better!
(
NOTE: you can also use Hades Workshop to convert the 3D objects by choosing
Options -> Automatically Convert 3D Models. This only works for assets that are of
Type 1 (gameObject) in
p0data2 (weapons and battle scenes),
p0data3 (couple of world map objects) and
p0data4 (3d characters, accessories, monsters and textures). However, converting as
Wavefront OBJ this way will convert the characters in a default
T-pose!)
And that's finally really it! 😊 As you can see, you can use different tools and methods to extract the 3D models from Final Fantasy IX, from either the original 2000 PlayStation version or the 2016 Steam version, and you can of course combine assets from both versions like the textures like I did. 😉
Have fun and stay tuned because I will start making
Beatrix into a
papercraft model next using the extracted game model as a base reference!
Tools used:
- Offline version of Reverse FF9 by tasior2: http://forums.qhimm.com/index.php?topic=15957.msg258062#msg258062 (download the offline version from the MEGA link in reply #49 by Chev on the bottom of the second page in the forum thread)
- Archived online version of Reverse FF9: https://web.archive.org/web/20170630205633/http://beta-reverseff9.rhcloud.com/ (archived version)
- Blender v2.79: https://www.blender.org/download/releases/2-79/ (the newer 2.8x versions don't seem to have a .3ds import option anymore; so it's your choice whether you really want the latest version)
- Metasequoia: https://www.metaseq.net/en/
- Noesis v 4.4.2 by Rich Whitehouse (to extract the weapons): https://richwhitehouse.com/index.php?content=inc_projects.php&showproject=91
- Hades Workshop v0.41c by Tirlititi (to extract hi-res textures): http://forums.qhimm.com/index.php?topic=14315
Addendum 1: FF9.IMG folder directory list for Noesis (found on http://forums.qhimm.com/index.php?topic=13145.msg182978#msg182978):
well the folders for FF9 are (this info was taken from Zerox)
- dir00 - Status/Menu/Battle/... -Text and random stuff.
- dir01 - Misc Images (Logos, Fonts, World 'mini' Map images, etc).
- dir02 - Dialog Text
- dir03 - Map models (Mini-zidane, airships, save point moogle, tent...) and, IIRC, the map texture.
- dir04 - Field models
- dir05 - Monster Data (Part I, stats, names, etc).
- dir06 - Location Data (Dungeon, Cities, etc).
- dir07 - Monster Data (Part II, 3d models)
- dir08 - Weapon Data (including models)
- dir09 - Samplebanks and Sequencer Data (ie music).
- dir10 - party members Data (including models)
- dir11 - Sound effects
- dir12 - World Map Data.
- dir13 - Special effects (magic, summons...)
Addendum 2: Directory dir08 .ff9db weapons list for Noesis (made myself, may contain mistakes):
- file0001.ff9db - Hammer
- file0002.ff9db - Golem's Flute
- file0003.ff9db - Hamelin
- file0004.ff9db - Angel Flute
- file0005.ff9db - Broadsword
- file0006.ff9db - Ultima Sword
- file0007.ff9db - Ragnarok
- file0008.ff9db - Mythril Sword
- file0009.ff9db - Iron Sword
- file0010.ff9db - Diamond Sword
- file0011.ff9db - Coral Sword
- file0012.ff9db - Ice Brand
- file0013.ff9db - Blood Sword
- file0014.ff9db - Save the Queen
- file0015.ff9db - Rune Blade
- file0016.ff9db - Flame Saber
- file0017.ff9db - Dragon's Hair
- file0018.ff9db - Dragon's Claw
- file0019.ff9db - Zorlin Shape
- file0020.ff9db - Multina Racket
- file0021.ff9db - Air Racket
- file0022.ff9db - Rune Claws
- file0023.ff9db - Duel Claws
- file0024.ff9db - Tiger Racket
- file0025.ff9db - Priest's Racket
- file0026.ff9db - Mythril Racket
- file0027.ff9db - Magic Racket
- file0028.ff9db - Rod
- file0029.ff9db - Wizard Rod
- file0030.ff9db - Asura's Rod
- file0031.ff9db - Whale Whisker
- file0032.ff9db - Javelin
- file0033.ff9db - Heavy Lance
- file0034.ff9db - Trident
- file0035.ff9db - Partisan
- file0036.ff9db - Holy Lance
- file0037.ff9db - Obelisk
- file0038.ff9db - Cat's Claws
- file0039.ff9db - Scissor Fangs
- file0040.ff9db - Kaiser Knuckles
- file0041.ff9db - Avenger
- file0042.ff9db - Mage Masher
- file0043.ff9db - Dagger
- file0044.ff9db - Gladius
- file0045.ff9db - Mage Staff
- file0046.ff9db - Octagon Rod
- file0047.ff9db - Cypress Pile
- file0048.ff9db - Oak Staff
- file0049.ff9db - Mace of Zeus
- file0050.ff9db - High Mage Staff
- file0051.ff9db - Fork
- file0052.ff9db - Gastro Fork
- file0053.ff9db - Bistro Fork
- file0054.ff9db - Mythril Rod
- file0055.ff9db - Healing Rod
- file0056.ff9db - Stardust Rod
- file0057.ff9db - Lamia's Flute
- file0058.ff9db - Siren's Flute
- file0059.ff9db - Mythril Spear
- file0060.ff9db - Ice Lance
- file0061.ff9db - Poison Knuckles
- file0062.ff9db - Tiger Fangs
- file0063.ff9db - Mythril Claws
- >file0064.ff9db - Mythril Dagger
- file0065.ff9db - Ice Staff
- file0066.ff9db - Flame Staff
- file0067.ff9db - Lightning Staff
- file0068.ff9db - Sliver Fork
- file0069.ff9db - Mythril Fork
- file0070.ff9db - Needle Fork
- file0071.ff9db - Sargatanas
- file0072.ff9db - Angel Bless
- >file0073.ff9db - Rune Tooth
- file0074.ff9db - Exploda
- file0075.ff9db - Ultima Weapon
- file0076.ff9db - The Tower
- file0077.ff9db - Masamune
- file0078.ff9db - The Ogre
- file0079.ff9db - Butterfly Sword
- file0080.ff9db - Orichalcon
- file0081.ff9db - Exalibur II
- file0082.ff9db - Exalibur
- file0083.ff9db - Kain's Lance
- file0084.ff9db - Defender
Addendum 3: Streaming Assets archives list for Hades Workshop (incomplete):
- p0data2 - weapons and battle scenes
- p0data3 - a couple of world map objects
- p0data4 - 3d characters, accessories, monsters and textures
- p0data5 - animations
- p0data6 - music
I made a combined version of this tutorial as a single image again, only this time because the tutorial was so long, I made it into a more condensed version. So be sure to refer back to this blogpost for the more detailed explanation!