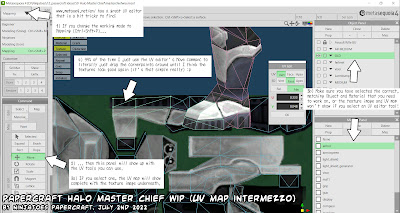
On my last Halo Masterchief papercraft WIP post, I got a question about how I adjust the UV map after changing the 3D model?
I usually don't try to explain the features of Metasequoia, becuase it takes me a lot of time to answer just one question and there are other websites, tutorials and forums with people that you can find with some searching where people explain it much better than I, and even more importantly, it's Metasequoia if you just play around with all the buttons yourself and see what they do. 😀
But you do have to find the buttons, and unfortunately I think the UV Map tools in Metasequoia are a bit hidden, so I thought I'd make this post to show where to find them at least. 😊
If the UV map is simple and the change isn't that big though (like making 1 bigger rectangle out of 2 smaller ones like in this case) then a lot of times the UV map usually doesn't even need to be changed. 😉
For bigger changes or more 'complex' shapes though, sometimes the texture will get messed up because you're trying to put the flat 2D image texture on a completely different 3D shape that it wasn't designed for so you have to compensate for that by adjusting the UV map)
Like I said, I use Metasequoia ( https://www.metaseq.net/en/ ) to do this kind of 3D editing for papercraft and it has a very intuitive (at least I think so) UV editor tool that works great for this kind of simple things, but like i said it's a little bit hidden:
- The easiest way to find it, is to change the working Mode to Mapping, with the big dropdown button in the top left of the screen (you can also use the shortcut Ctrl+Shift+P)
- Then on the left side, a set of new tools shows up including the UV Edit tools
- Now if you select one of the UV Edit tools, the texture image will show up with a bunch of lines, which is the UV map.
99% of the times I just use the UV Edit Move tool: you can click on a cornerpoint of the UV map and drag it around, and you can see the texture on the 3D model change while you're doing it, so I literally just drag the cornerpoints of the UV map on the texture image until I think it looks good again.
It really is that simple. 😉
So I hope I didn't disappoint anybody by revealing there's no real secret here; it's really just playing around with the tools until *you* are happy with the results.
I'm by no means a 3D expert, and I just use 'simple tools' like these to do basic things. In the end I'm a papercrafter, and I'm just editing an existing 3D model so it will make a nicer papercraft! (I hope 😉)
There are lots of other 3D programs out there that I imagine have a similar tool for adjustsing the textures/UV map. It's a big part of 3D modelling, so there are bound to be tutorials or forum posts about it for the software that like you to use.
I like Metasequoia because there's a free version (I think that's amazingly generous of the creators!) that lets me do all the things I need and works great with Pepakura Designer.
It was intuitive for me to learn (just by trying all the buttons and playing around, I'm still learning new or easier ways to do things from time to time; if I can do it, then certainly you can too. 😋)
Have fun!


No comments:
Post a Comment